This article follows on from the Managing blocklists using a central platform (part1) article.
Previously, we discussed what a deployment is and the various modifications available in the Blocklist Management Platform. Now, let’s take a deeper look at how each stage of deployment creation is executed.
Building Deployments
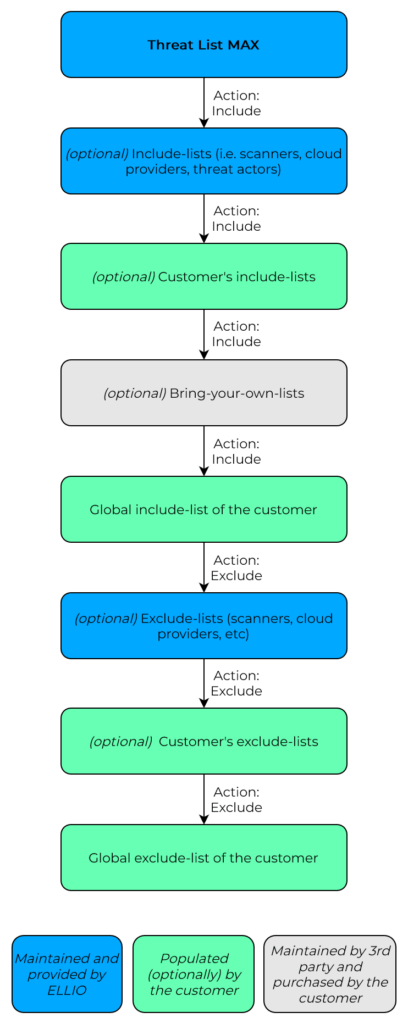
Understanding how deployments are built and deployed is crucial for effective blocklist management. Here’s a step-by-step overview:

Step 1: Start with a base
Every deployment begins with a base blocklist, such as Threat List MAX, our most extensive and dynamic blocklist. It’s continuously updated through our network of sensors and real-time architecture, making it one of the most comprehensive blocklists available.
Step 2: Add Predefined Include Lists
Next, you can enhance protection by adding predefined include lists. These can include:
- Internet Scanners: Blocking scanners like Shodan and Censys helps conceal your network from public scanning services.
- Specific Cloud Providers: Include IP ranges from cloud providers known to host malicious activities.
- Threat Actor IPs: Predefined lists of IPs associated with specific threat actors.
Step 3: Incorporate Custom Include Lists
Optionally, you can add custom include lists that you manage. For instance:
- Threat Intelligence Feeds: Integrate feeds from trusted sources that identify malicious IPs.
- Sector-Specific Threats: Add IPs relevant to your industry or organization.
These lists can be applied to multiple deployments, offering flexibility and control over your security measures.
Step 4: Integrate Bring-Your-Own-Lists
If you have existing blocklists from other sources, you can integrate them into the Blocklist Management Platform. Whether they’re proprietary lists or paid subscriptions, we’ll manage and distribute them, ensuring consistent application across your network.
Step 5: Apply the Global Include List
Each organization has a Global Include List, a default list applied to all deployments. It’s ideal for adding IPs you consistently want to block across your entire infrastructure. For smaller organizations, this might be the primary method of adding custom blocks.
Step 6: Execute Predefined Exclude Lists
Select from predefined exclusion lists to prevent blocking critical services. Examples include:
- Security Service Providers: Exclude IPs from services like ZScaler or Palo Alto Networks to ensure their scanners aren’t blocked.
- Government Agencies
- Emergency Services
Step 7: Execute Custom Exclude Lists
Create multiple custom exclusion lists tailored to specific deployments. For example:
- Data Centers: Exclude IPs from your data centers conducting legitimate scanning or operations.
- Business Partners: Ensure seamless communication with partners by excluding their IPs.
Step 8: Execute Global Exclude List
Similar to the Global Include List, the Global Exclude List ensures specified IPs are never blocked across any deployment. It’s perfect for whitelisting critical infrastructure or services essential to your operations.
Exclusion Takes Precedence
In our deployment process, exclusions always take precedence over inclusions. This means that if an IP address appears in both an include list and an exclude list, the IP will not be included in the deployment—it won’t be blocked. For example, if you add IP ‘1.1.1.1’ to both the global include and global exclude lists, the IP will not appear in any deployments.
This approach aligns with cybersecurity best practices, where avoiding false positives is crucial to maintaining operational integrity.
In the next part we are going to take a look at how the Blocklist Management Platform integrates into the NOCs and SOCs workflows and also take a look at a few examples.
Useful links
- Try ELLIO: Blocklist Management with a 7day trial.
- Find out out ELLIO: Threat Intelligence to reduce alert fatigue and speed up threat hunting.
- Use a free ELLIO IP Lookup to check suspicious IPs.
- Explore ELLIO: Threat List MAX, the largest and most dynamic IP blocklist on the market, compatible with all popular next-gen firewalls.
- Download ELLIO Free Community IP Blocklist.
About ELLIO
ELLIO is a leading expert on mass exploitation, cyber deception, and opportunistic reconnaissance, delivering real-time, accurate threat intelligence to automate triage and reduce alert fatigue in SIEM, SOAR, TIP, accelerate incident response and threat hunting. ELLIO also offers the largest and most dynamic threat lists (blocklists) and blocklist management platform to strengthen perimeter and firewall defences. More about ELLIO at https://ellio.tech


Comments 2