Discover why adding advanced ELLIO Blocklists to your FortiGate v. 7.2.0/7.4.0 is a great way to boost its protection, and how easy it is to set up. This article gives you a simple, step-by-step guide to set up an external IP blocklist and firewall rules on FortiGate 7.2.0/7.4.0.
In this article, you’ll find:
- A practical installation tutorial for setting up an IP blocking on FortiGate 7.2.0/7.4.0.
- What ELLIO Blocklist is and why it’s beneficial for next-gen firewalls incl. FortiGate.
- How to get a free trial to test ELLIO’s Threat Lists (MAX and ONE blocklists).
- Access to the ELLIO free community IP blocklist.
38M unwanted connection filtered out with ELLIO in 30 days
ELLIO: Threat List MAX is the largest and most dynamic external IP blocklist on the market, designed to provide reliable protection against active malicious IPs at the perimeter level. Featuring an average of 175,000 to 450,000 entities, ELLIO blocklists efficiently filter out mass exploitation attempts, automated bots, account takeovers, spambots, proxy traffic, fake account creation, and malicious Tor activity. They are automatically updated every minute or customized to your preferences.
Here are some stats from setting up ELLIO on your FortiGate firewall:
- More than 38 million unwanted connections were filtered out by ELLIO during 30 day period.
- Each dynamic ELLIO: Threat List MAX contained on average over 270.000 IP addresses during 30 day period..
- After activating ELLIO: Threat List MAX, the number of reported False Positives is zero.
How to set up an external IP blocklist and firewall rules on FortiGate 7.2.0/7.4.0
1. Setup of an external feed
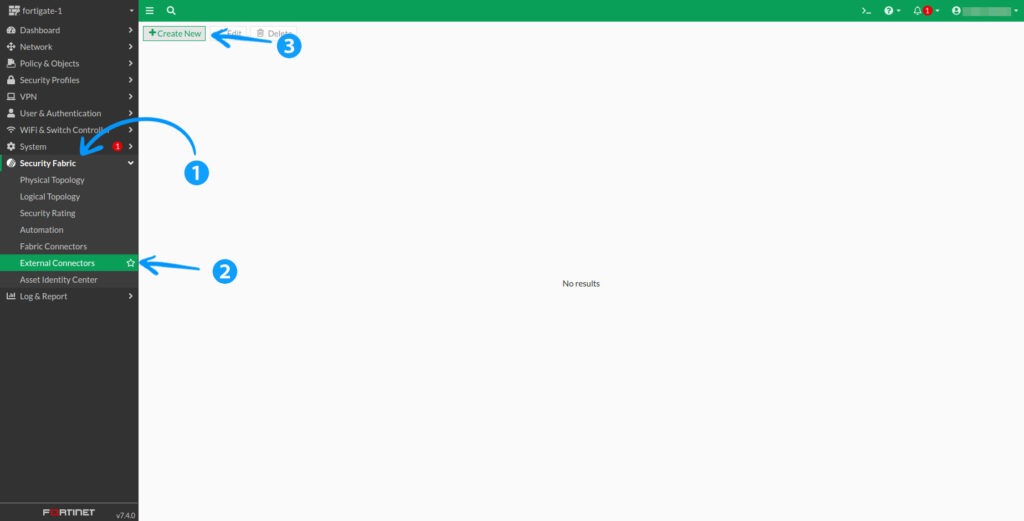
1.1 To add en external feed, go to Security Fabric > External Connectors in the menu and click the +Create New button.
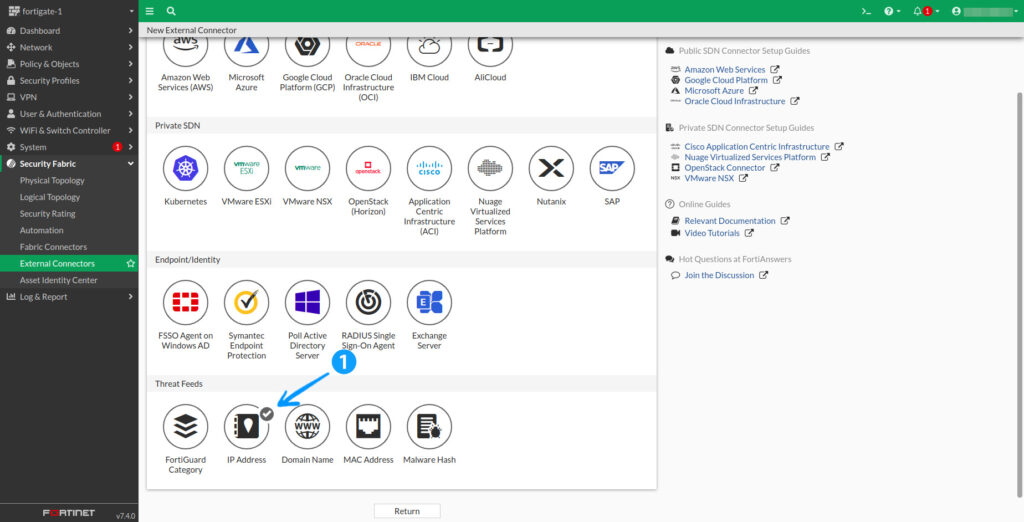
1.2 Scroll down to Threat Feeds and select IP Address.
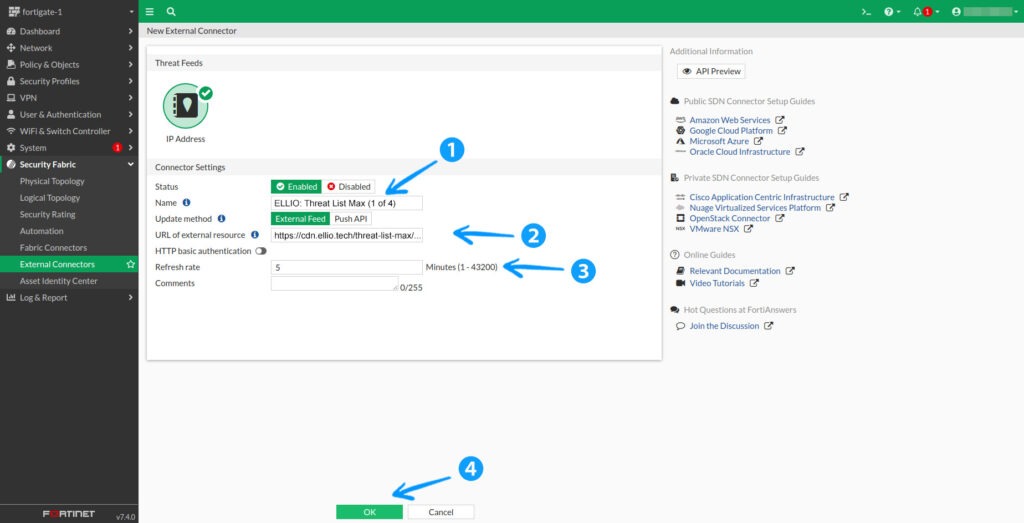
1.3 Fill in the Name field with something easily identifiable, e.g., ELLIO: Threat List MAX. Enter your link as the URL of the external resource, disable HTTP Basic Authentication, and set the Refresh Rate according to your subscription tier. Finally, click OK.
1.4 Once created, wait a few moments for the latest version to download. If you’re as impatient as I am, you can click the Refresh button in the upper right corner. Hovering over the feed box will display an information panel with more details. Once the feed is successfully downloaded, you’ll see the number of entries, latest content update, and more.
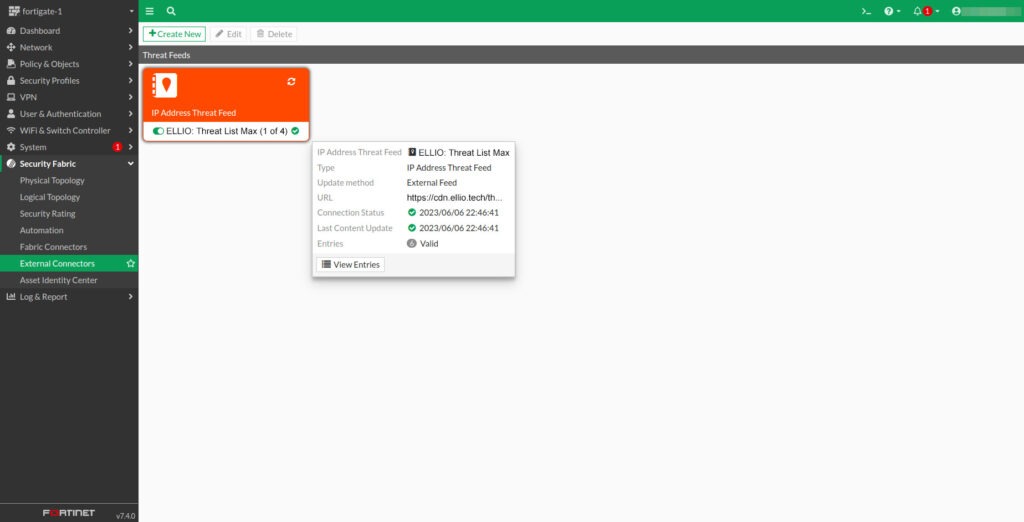
1.5 To view the IP addresses we currently recommend blocking, click View Entries.
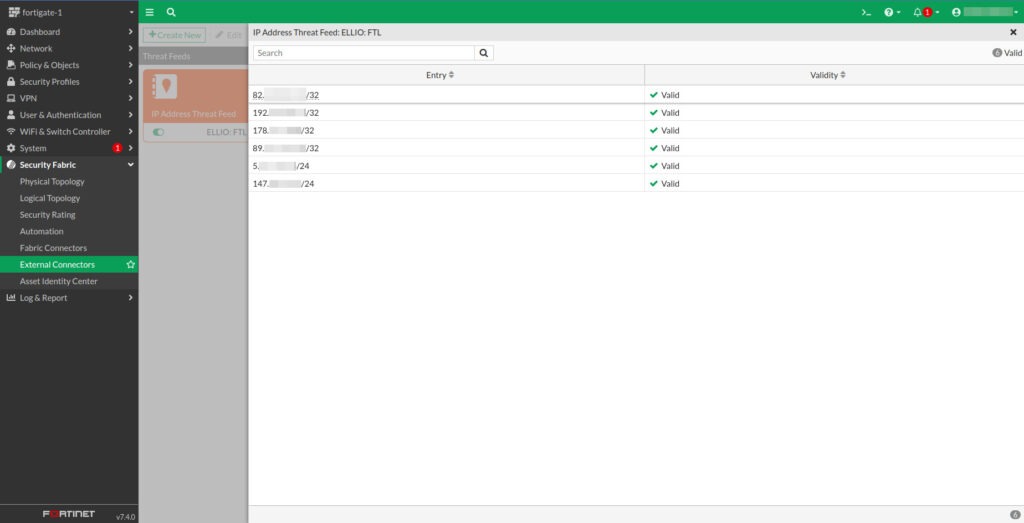
2. Setup of Firewall rules
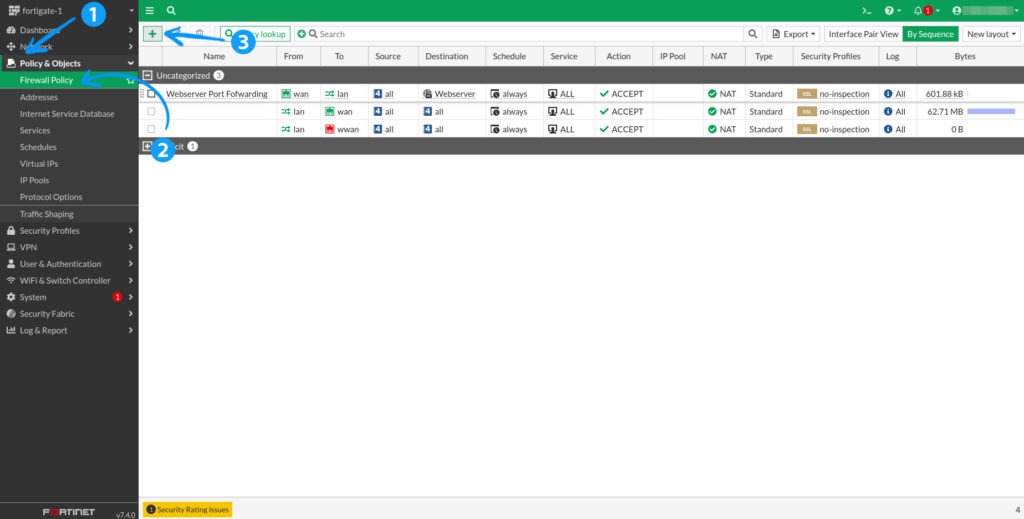
2.1 Once our feed is available in your FortiGate instance, you can create firewall rules based on it. Navigate to Policy & Objects > Firewall Policy and click the green + to create a new rule.
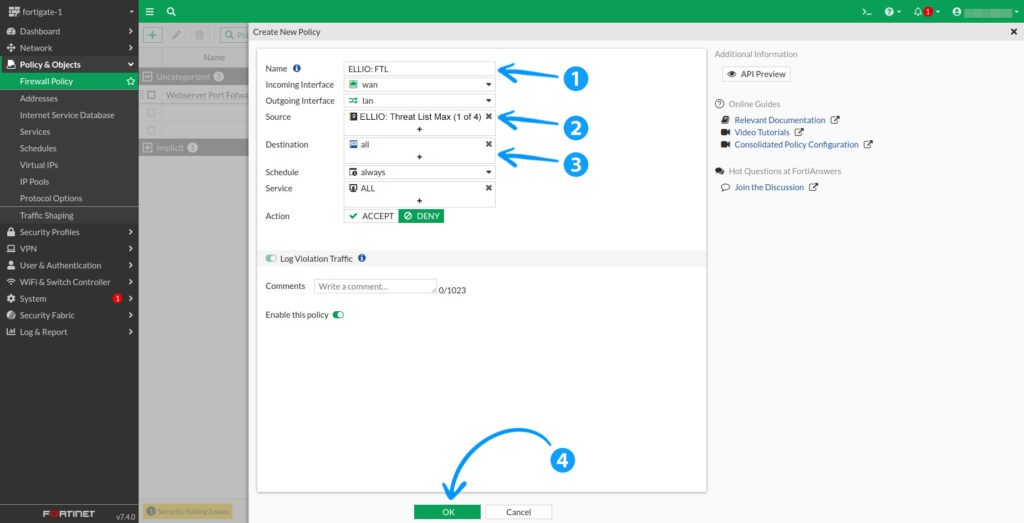
2.2 Fill in the Name field with something easily identifiable, e.g., ELLIO: FTL. Set your Incoming Interface to your WAN port and your Outgoing Interface to your LAN interface. If you have multiple interfaces of either type, duplicate this rule for each.
Click the + sign next to Source to display the list of entries, and select the one named during the external feed setup. For Destination, we recommend setting it to All. Keep the Schedule set to Always, select ALL from the list of services, and set the Action to Deny.
Click OK to create the rule.
2.3 Now, rearrange the firewall rules by dragging the newly created rule above the rule that allows access to services. Simply drag and drop it into the desired position.
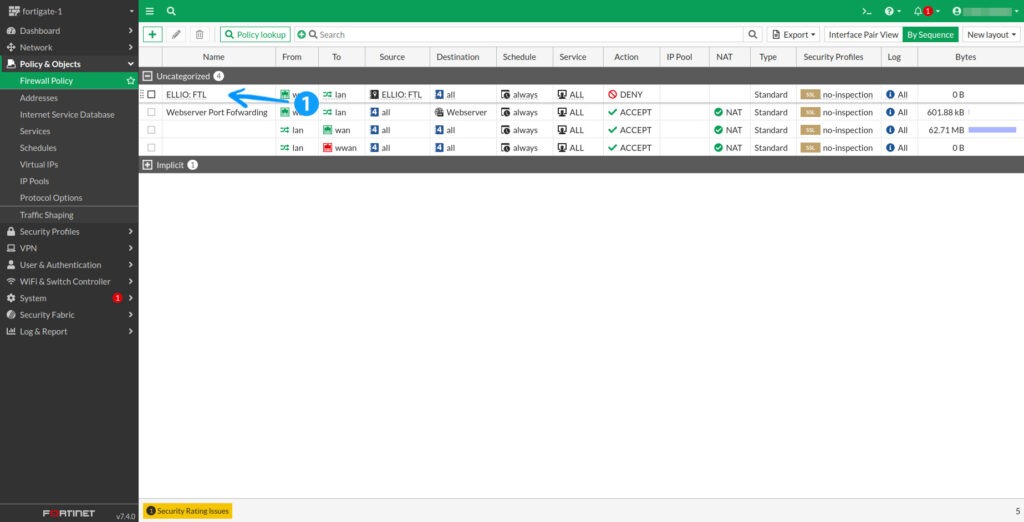
2.4 After a short while, you will see the amount of traffic blocked by our feed.
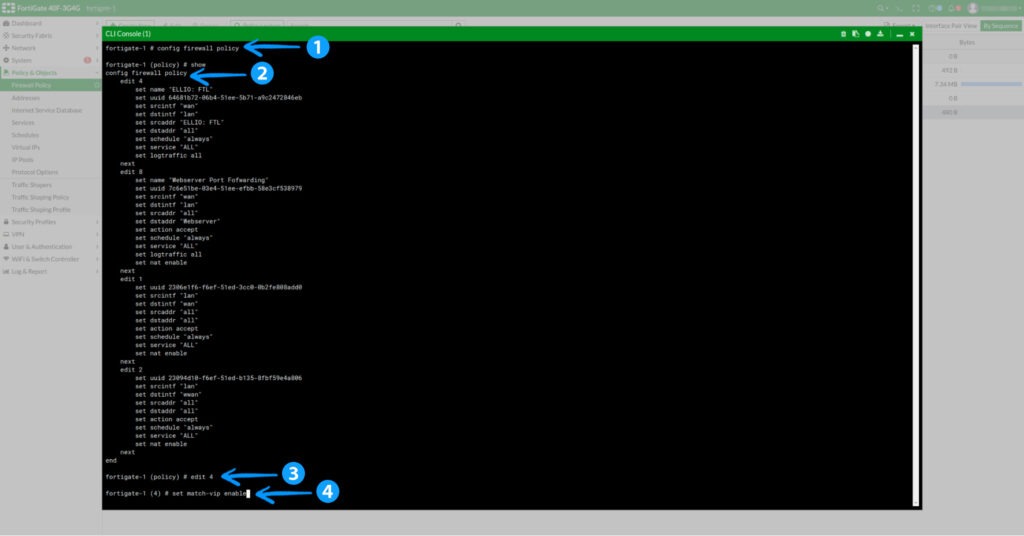
Note 1: If you’re using VIP for port-forwarding or other use cases, you may need to enable the match-vip setting for the firewall rule.
To do this, enter the CLI by clicking the cmd symbol >_ next to the question mark in the upper right corner.
Type config firewall policy to enter config mode, then execute the show command to display all active policies. This will help you find the number of your rule (in the example below, it’s number 4).
Next, run the following commands:
edit 4
set match-vip enable
Save it by using end command.
Note 2: FortiGate has a limit of approximately 130,000 IP addresses per external IP feed. You will receive 4 links from us – use all 4 to create External Feed objects, and then apply them to your firewall as usual.
Try ELLIO IP blocklists with free trials
Visit the ELLIO Demo Space, complete a brief online form, and receive a 14-day free trial of either the ELLIO Threat List MAX or ONE. The trial provides the same protection features as the paid commercial version. Enjoy testing, and share your feedback with us on our ELLIO community Slack.
Access to ELLIO Free Community IP Blocklists
To support the tech community, ELLIO provides a free community version of its ELLIO: Threat List for non-commercial use. Homelabbers and tech enthusiasts can download it from this link: https://cdn.ellio.tech/community-feed.
Did you find this tutorial helpful?
Did this guide help you set up IP blocking on Fortigate firewall easily? We hope so! Feel free to share it with your friends, colleagues, or community.
About ELLIO
ELLIO offers advanced network security solutions for real-time visibility into mass vulnerability exploitation, botnets, scanning activities, and background cybernoise (aka mass attacks, background internet noise, or grey noise). Our IP Threat Intelligence and blocklists reduce alert fatigue, speed up triage, enhance automation, and boost network firewall protection, leading to more efficient security operations and better-optimized resource allocation. ELLIO integrates seamlessly with next-gen firewalls, SOAR, SIEM, TIP, through API or as a local database for most demanding on-premises workloads.
Join us on social media
LinkedIn, Twitter, Mastodon, and ELLIO Community Slack
Latest Posts:
- Catching up with BSides communities via network fingerprints
- React2Shell in the Wild: Payload Analysis, Active Campaigns, and IoCs
- From Scan to Exploit: Inside the Latest Cisco ASA/FTD Campaign
- Every packet tells a story: The evolution of fingerprinting and netsec.
- Black Hat 2025: ELLIO debuts new open-source recon shield


