Explore how to set up IP filtering on pfSense, an open-source firewall/router solution, in just a few minutes, and discover why you should use advanced IP blocklists from ELLIO for this purpose.
- What is ELLIO: Treat List and why use it for IP filtering?
- Step-by-step installation guide for setting up an external IP blacklist on pfSense.
- Test ELLIO: Threat List (blocklist) with a 14-day free trial.
- Get the ELLIO Free Community Blocklist.
Why use ELLIO for IP blocking on pfSense
ELLIO offers the largest, fastest, and most advanced external IP blocklist available today. While others offer updates every hour or every 15 minutes, ELLIO updates their lists every 1 or 5 minutes, depending on your plan. On average, ELLIO rotates over 10% of IP addresses daily. You will receive their master blacklist in all formats, not only for pfSense, but also for OPNSense, Fortinet, Palo Alto Networks, Check Point, F5, Cisno, ntopng, and more.
ELLIO blocklists protect you from the latest active malicious IPs, mass exploitation, and evil bots. They also help reduce your perimeter footprint and keep attackers at bay until detections are available, protecting your network before security teams patch new vulnerabilities.
Choose from these ELLIO blocklists:
- ELLIO: Threat List MAX – includes 175,000 – 400,000 entities, with automatic updates from every minute.
- ELLIO: Threat List ONE – contains 40,000 – 90,000 entities, tailored to your network perimeter, with automatic updates from every 5 minutes
- ELLIO Free Community blocklist – features 25,000 entities, with automatic updated every 5 minutes
How to set up an external IP blocklist on pfSense
Part 1 – Installation of pfBlockerNG
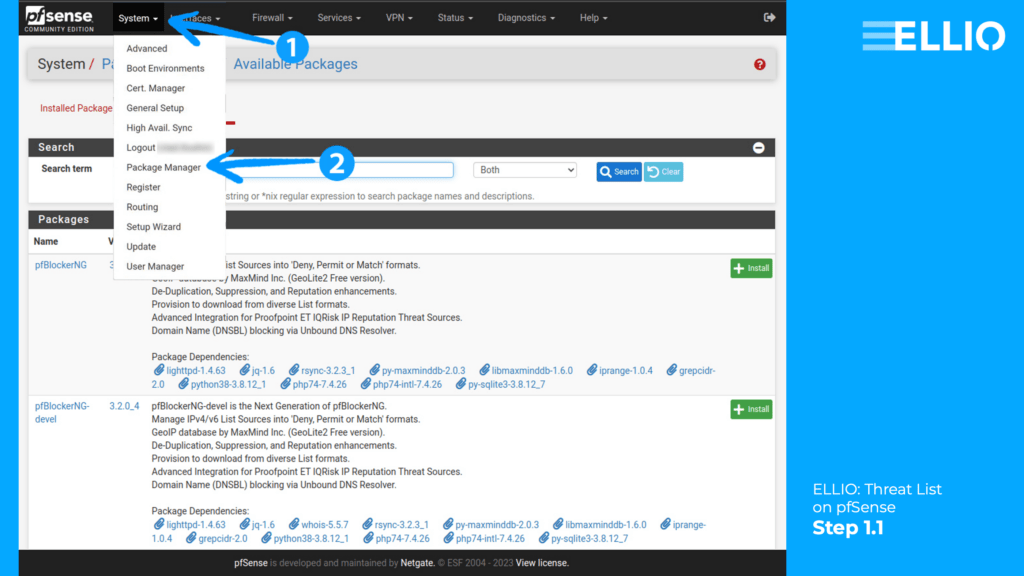
Step 1.1 Let’s get started! To consume IP blocking feed on pfSense, you first need to install the pfBlockerNG package. To do this, click on System >> Package Manager.
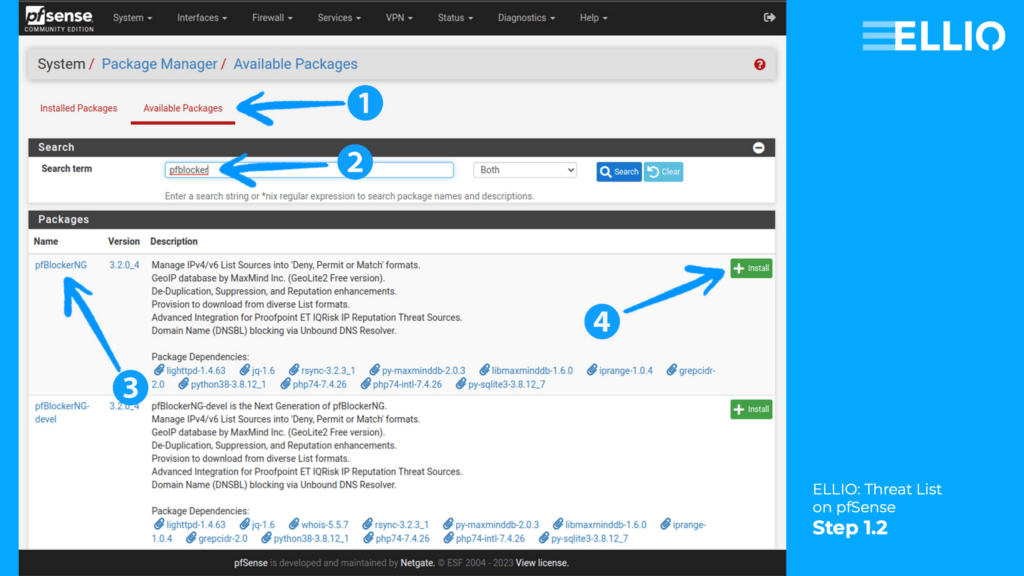
Step 1.2 Now, select Available Packages and search for pfBlockerNG. You should see two results: the standard version and the devel version. You can work with either of them, but for the production environment, we recommend using the standard version. Click on Install.
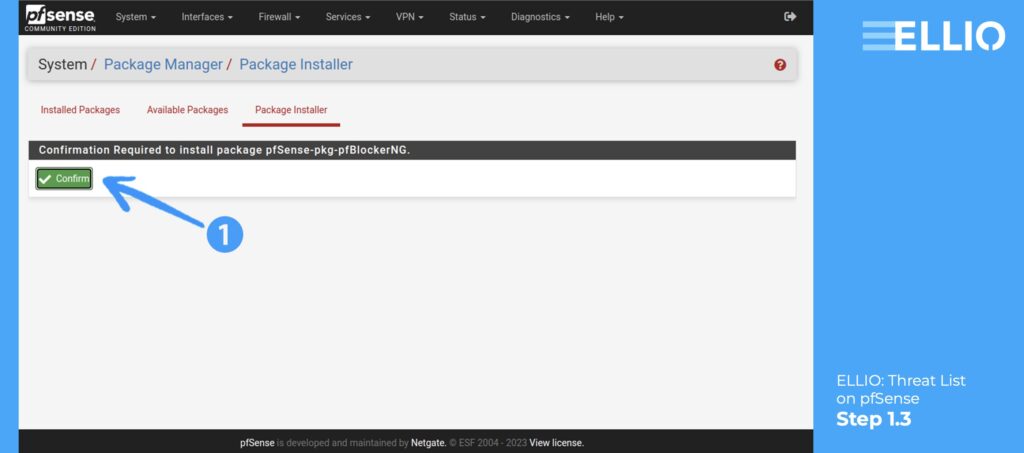
Step 1.3 Click Confirm.
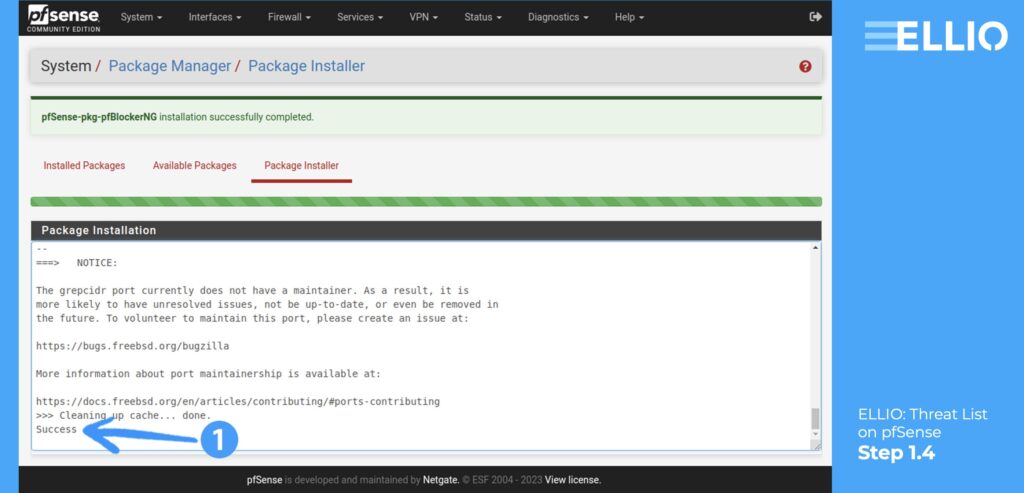
Step 1.4 Now wait until you can see Success in the installation log. Congratulations, you have successfully installed pfBlockerNG.
Part 2 – Configuring of pfBlockerNG
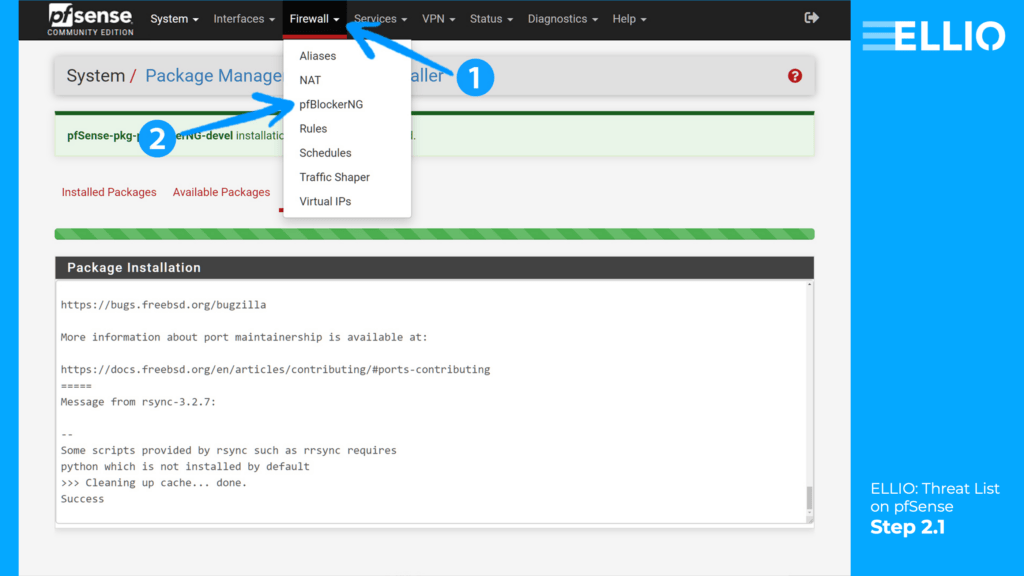
Step 2.1 Once the installation process is complete, navigate to Firewall >> pfBlockerNGand click on the Wizard if it doesn’t open automatically.
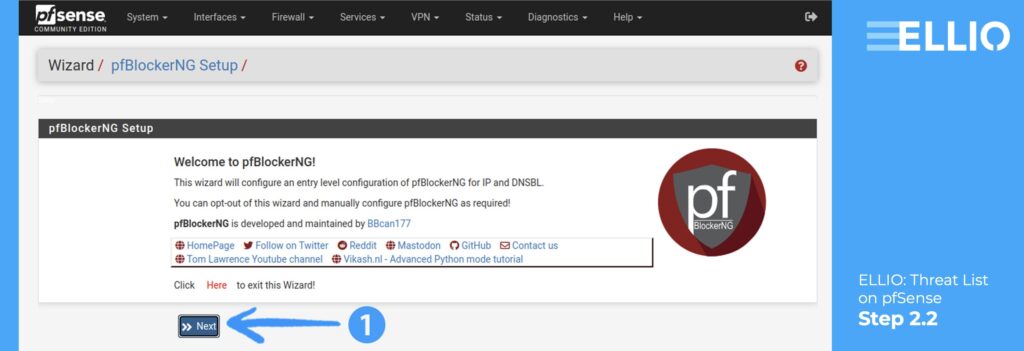
Step 2.2 Click on Next.
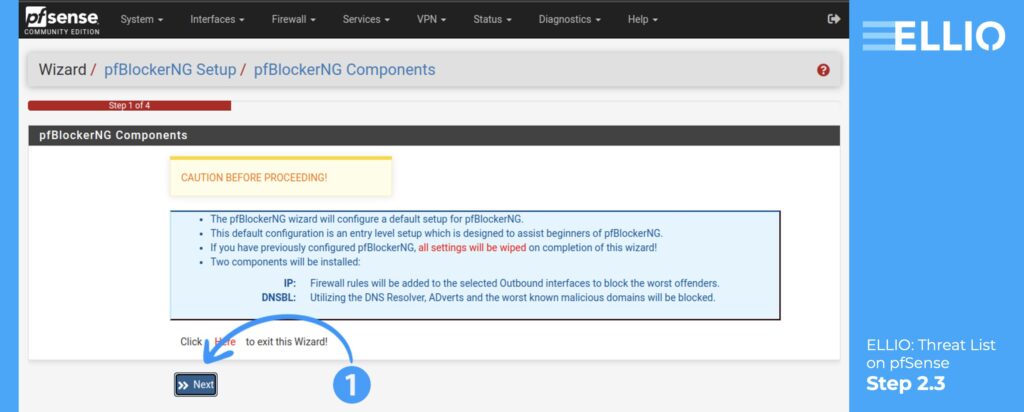
Step 2.3 Click on Next.
Step 2.4 In the second step, select all publicly facing interfaces as the Inbound Firewall Interfaces, and the remaining interfaces as the Outbound Firewall Interface. Then, click on Next.

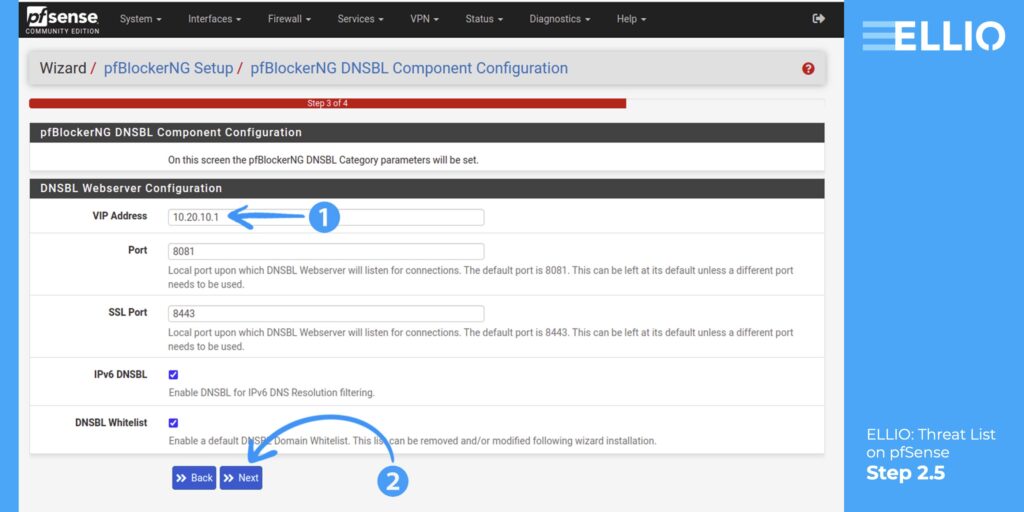
Step 2.5 In the third step, set a private IP address that is not used by your network, ideally from a different subnet, as the VIP Address. If you plan to use DNS blocking (which is not currently covered by our product) and you are using IPv6 and wish to enable IPv6 DNSBL, feel free to check the corresponding option in this step. Otherwise, leave the other options with their default values and click Next.
Step 2.6 In the fourth step, simply click on Finish to complete the installation and setup of pfBlocker.

Part 3 – ELLIO: Threat List (blocklist) setup
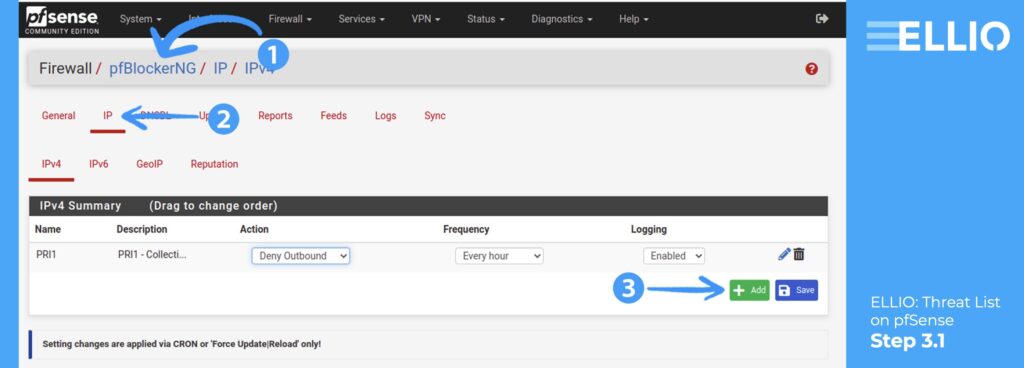
Step 3.1 The final part of the setup is to add our feed into pfBlockerNG. To do this, click on the IP section, choose the IPv4 sub-section, and click on the Add button.
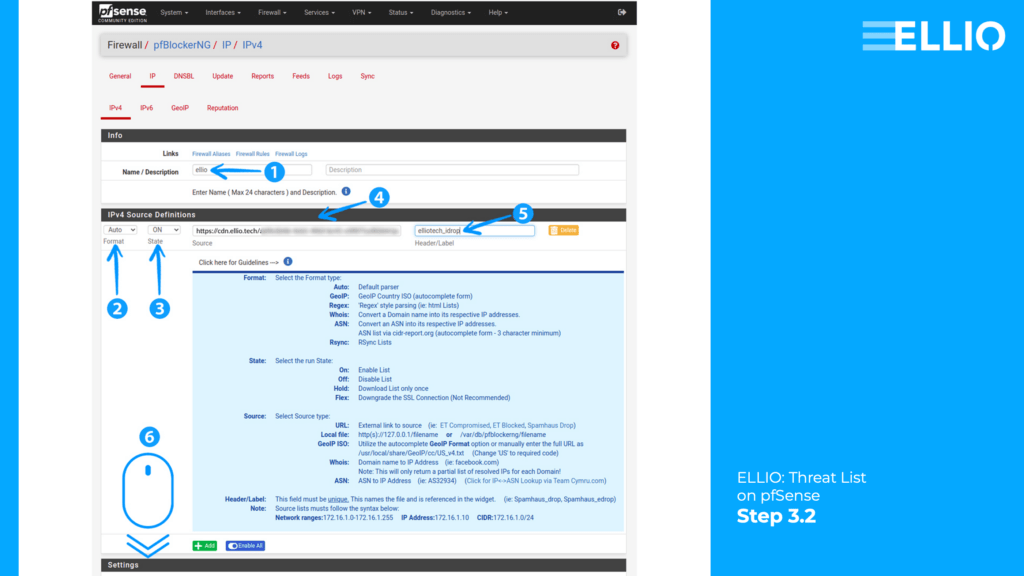
Step 3.2 ❶ Fill in the Name/Description field with a text that makes it easily identifiable for you. ❷ For the IPv4 Source Definition set Format to Auto. ❸ For the IPv4 Source Definition ensure that the State is ON. ❹ Use the link to your pfSense Threat List. If you have ELLIO: Threat List MAX access, you should have received all the links via email. If you have ELLIO: Threat List ONE access, use the link provided on the deployment page. ❺ For Header/Label select something easily identifiable. ❻ Scroll down the page.
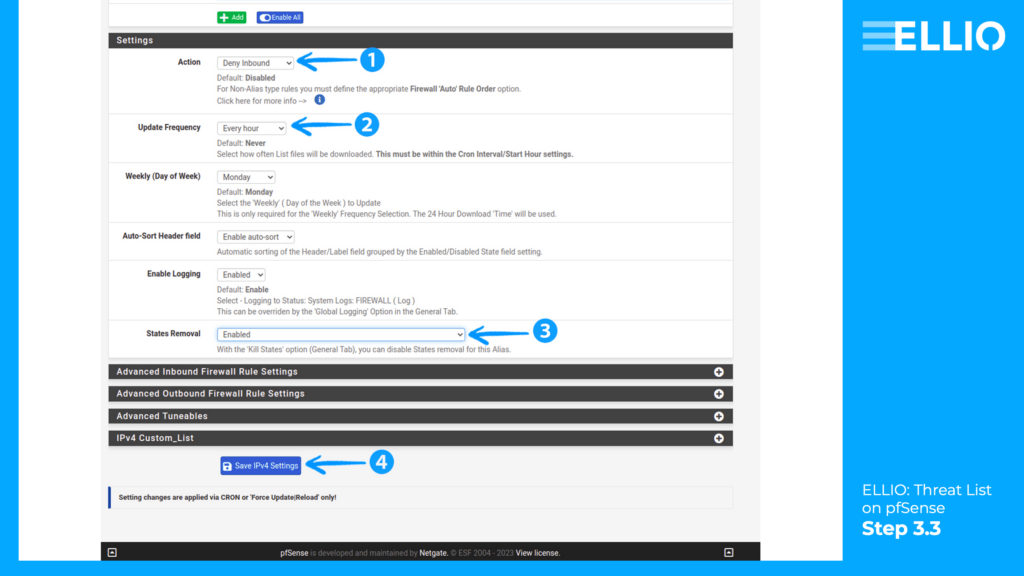
Step 3.3 ❶ In the Settings section, select Deny Inbound as the Action. ❷ Choose Every hour as the Update Frequency. The “Weekly (Day of Week)” field is not of interest to us since we update more often. ❸ Ensure that the other fields in this section are set to Enable.
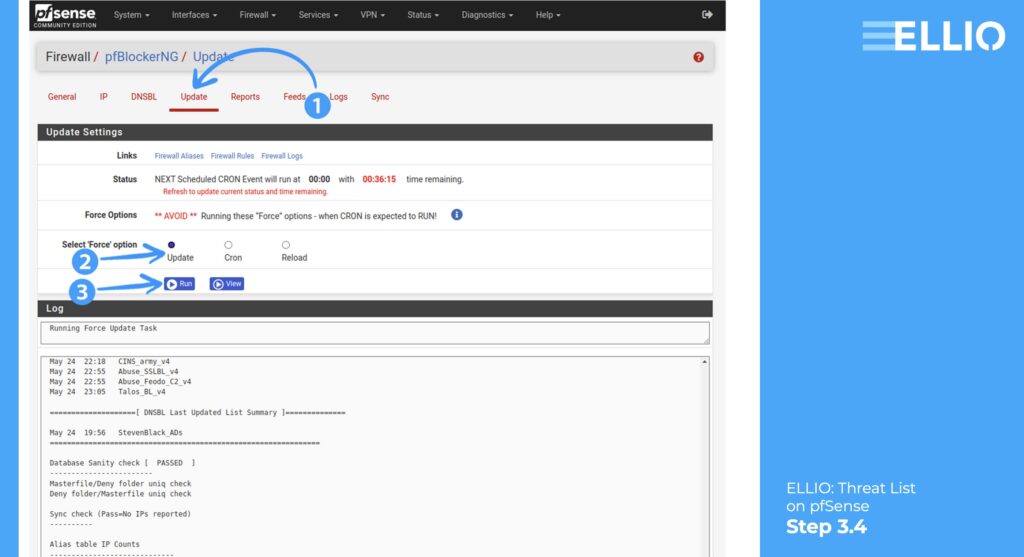
Step 3.4 In this penultimate step, load the settings by: ❶ Go to Update section.
❷ Select Update option. ❸ Click Run.
Part 4 – Validating ELLIO: Threat List setup (blacklist setup)
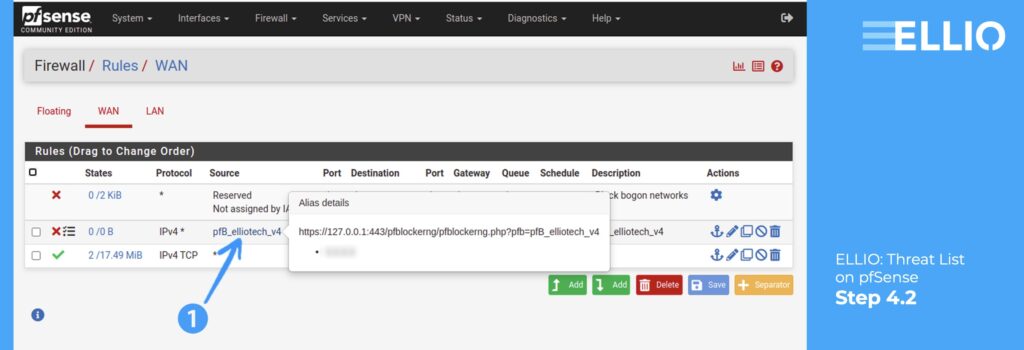
Step 4.1 Congratulations, you have reached the final part! If you want to verify that everything has been loaded correctly, go to Firewall >> Rules >> WAN.

Step 4.2 Hover your mouse over the source of the rule with a description starting with pfB_ and containing the name/description used when adding our feed. You should see Alias details with some of the IP addresses selected by our AI model.
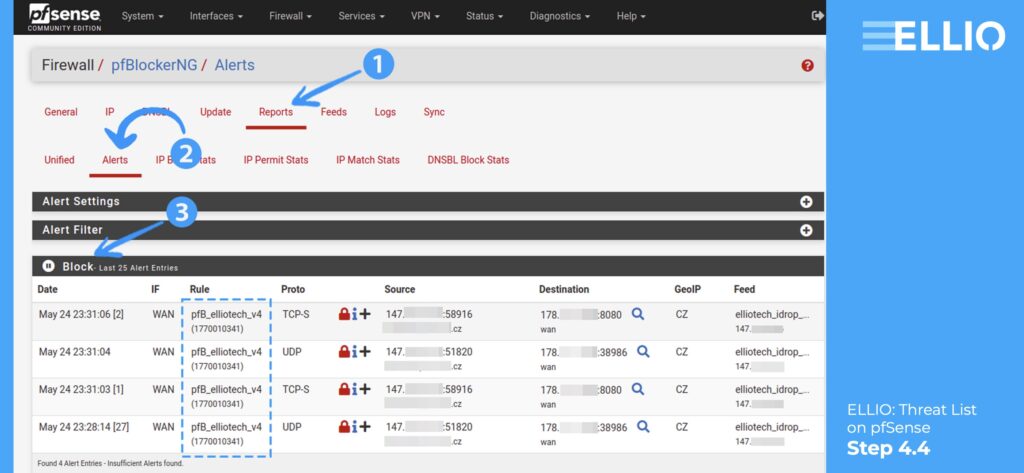
Step 4.3 After some time, you can visit Firewall >> pfBlockerNG.

Step 4.4 Here navigate to Reports >> Alerts and in Block section you can see what was blocked lately.
Test ELLIO IP Blocklist for free
Visit the ELLIO Demo Space, fill out a simple online form, and get a 14-day free trial of the ELLIO Threat List MAX or ONE. The trial version offers the same protection features as the paid commercial version.
Interested in ELLIO Free Community IP Blocklist?
To support the tech community, ELLIO offers homelabers and tech enthusiasts a free community version of its ELLIO: Threat List for non-commercial use. Download link: https://cdn.ellio.tech/community-feed
About ELLIO
ELLIO offers advanced network security solutions for real-time visibility into mass vulnerability exploitation, botnets, scanning activities, and background cybernoise (aka mass attacks, background internet noise, or grey noise). Our IP Threat Intelligence and blocklists reduce alert fatigue, speed up triage, enhance automation, and boost network firewall protection, leading to more efficient security operations and better-optimized resource allocation. ELLIO integrates seamlessly with next-gen firewalls, SOAR, SIEM, TIP, through API or as a local database for most demanding on-premises workloads.
Join us on social media
LinkedIn, Twitter, Mastodon, and ELLIO Community Slack


Comments 1
Comments are closed.